
"Why does my silicone hose keep blowing off?" That question lands in our inbox more than any other. The clamp is tight, the hose looks intact — yet the pipe walked itself off the fitting under boost. Nine times out of ten, the answer isn't the hose. It's a clamp sitting in the wrong spot, or a fitting that was wiped with a shop rag and called "clean enough."
We've been manufacturing silicone hoses for over twenty years, supplying everything from vacuum lines to intercooler pipes. The failures we see again and again aren't material defects — they're preventable mistakes in how the hose gets fitted. A proper silicone hose installation guide saves time, reduces comebacks, and keeps your customers' vehicles running reliably. Here's what matters when you're behind the lift.
TLDR
- Clean mating surfaces thoroughly before installation; oil and debris are the top causes of boost hose slippage .
- Never stretch the hose during installation; the inner diameter should match or be slightly smaller than the fitting OD .
- Position clamps behind the bead on the fitting, with at least 10mm of hose extending past the clamp .
- Check for twist after installation; even 5° of rotation can reduce hose life by 70% .
- Measure the fitting outer diameter, not the old hose inner diameter, when selecting replacement size.
Tools and Materials Needed
| Item | Purpose | Notes |
|---|---|---|
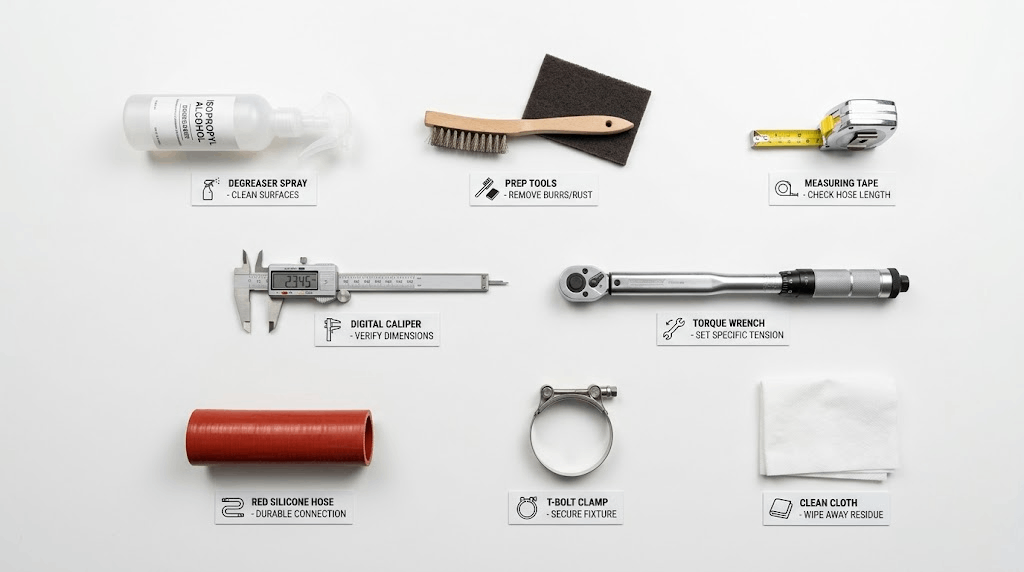
| Degreaser / isopropyl alcohol | Clean mating surfaces | Avoid petroleum-based cleaners |
| Wire brush or abrasive pad | Remove rust/debris from fittings | Use on metal surfaces only |
| Torque wrench | Apply correct clamp tension | Prevents overtightening |
| Calipers or measuring tape | Verify fitting dimensions | Measure OD, not ID |
| New silicone hose | Replacement component | Match temperature/pressure rating |
For complete kits with pre-cut lengths and matching clamps, check our Silicone Vacuum Hose Kits product page.
Preparation Steps
Clean Mating Surfaces Thoroughly
This step separates professional installs from weekend guesses. Engine compartments accumulate layers of oil mist, road grime, and condensation residue — none of which help a silicone hose maintain its grip.
Oil on the mating surface is one of the leading causes of boost hose slippage and leakage. We've traced countless field failures back to this single oversight: the fitter wiped the pipe with a shop rag, saw no visible dirt, and assumed it was ready. But microscopic oil films survive wiping and create a lubricated interface between the hose and fitting. Under vacuum or boost, that film lets the hose creep outward until it slips free.
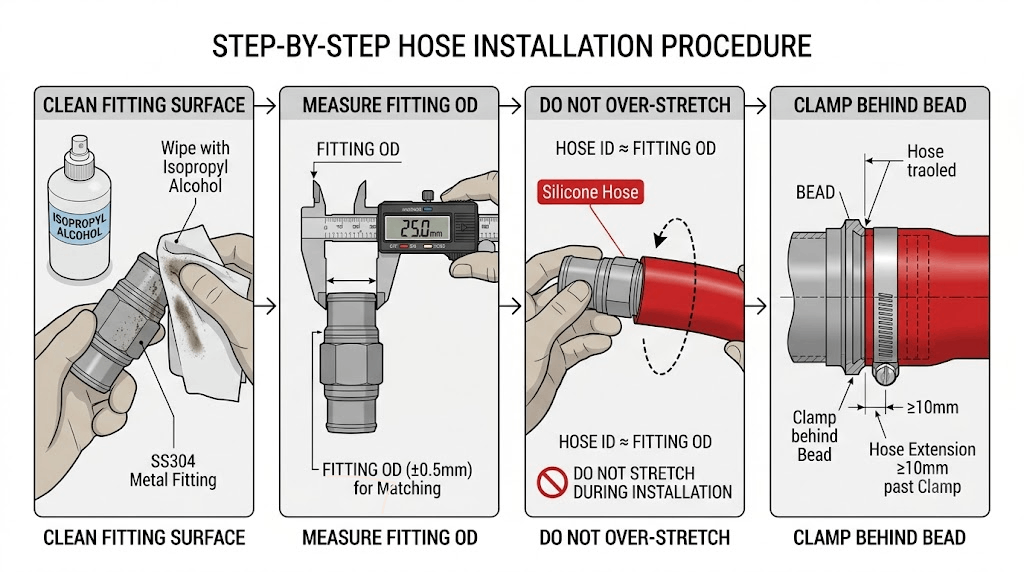
Use isopropyl alcohol or a dedicated degreaser. Petroleum-based cleaners leave residues that degrade silicone over time, so skip brake cleaner or gasoline. Scrub with a wire brush if there's surface rust or carbon buildup on metal fittings. The goal isn't cosmetic perfection — it's removing anything that compromises friction between the hose ID and the fitting OD.
One detail shops often miss: clean both sides of the joint. If you're replacing a section between two fittings, prep both ends. A clean surface on one side doesn't compensate for contamination on the other.
Silicone Hose Installation Guide: Step-by-Step Process
Removing Old Hose
Cutting off the old hose is faster than wrestling it free, especially if it's hardened or bonded to the fitting. Use a sharp utility knife or hose cutter — don't pull or pry, which can damage the underlying fitting or adjacent components.
If the hose is stuck due to heat cycling or age, apply gentle heat with a heat gun (not an open flame) to soften the silicone. Once it's pliable, slice lengthwise along the fitting and peel it away. This preserves the fitting for reuse and avoids bending thin-wall tubing.
Inspect the fitting while it's exposed. Look for corrosion, dents, or worn beads that might compromise the new installation. Replace damaged fittings before proceeding — a new hose won't seal properly on a compromised surface.
Preparing Connections
After cleaning, verify the fitting dimensions. This is where many installations go wrong before the hose even touches metal.
Measure the outer diameter of the fitting you're connecting to, not the inner diameter of the old hose. Old hoses stretch over time, so their ID no longer reflects the correct size. A hose that fit snugly when new may have expanded 2–3mm after months of thermal cycling and pressure exposure. Using that stretched dimension as your reference means ordering a hose that's too large, guaranteeing a loose fit from day one.
Shineyoo manufactures our full range of silicone hoses and SS304 clamps to precise tolerances, supporting OEM/ODM customization for specific applications. When in doubt, measure twice and consult the manufacturer's sizing chart — or start from a kit that already covers the common sizes, such as our 5-size, 10 ft silicone vacuum hose kit (1/8″ to 3/8″ ID).
Installing New Hose
Do not stretch the silicone hose during installation. The hose inner diameter should equal or be slightly smaller than the fitting outer diameter. Forcing the hose on by stretching it distorts the tube wall and increases the likelihood of premature failure.
Here's why this matters: silicone relies on elastic recovery to maintain sealing pressure against the fitting. When you stretch it over a larger-than-specified diameter, you exceed its elastic limit in localized areas. The material doesn't snap back uniformly, creating thin spots and weak zones. Under boost pressure or vacuum, those zones become leak paths.
The correct approach: select a hose with an ID that matches the fitting OD within ±0.5mm. Slide it on using a twisting motion rather than straight pushing — this distributes force evenly around the circumference. If it requires excessive force to seat, the size is wrong. Don't muscle it into place.
For tight spaces, use a small amount of water-based lubricant on the fitting (not petroleum-based). This reduces initial friction without compromising long-term adhesion. Wipe away excess before final seating.
Securing with Clamps
Position the clamp behind the bead on the fitting, in the sealing zone. Ensure at least 10mm of hose extends past the clamp toward the open end. The anchor point is the bead, not an arbitrary millimeter measurement.
The bead (or raised ridge) on performance fittings serves a mechanical purpose: it prevents the hose from sliding off under axial load. Placing the clamp behind the bead — between the bead and the main body of the fitting — locks the hose in place. If the clamp sits in front of the bead (toward the open end), the hose can still slip past the bead under pressure, rendering the clamp useless.
The 10mm minimum extension ensures the clamp has sufficient contact area with the hose. Less than that, and the clamp edges dig into the silicone, creating stress concentrations that lead to cracking. More than 15mm is unnecessary and wastes material.
Tighten the clamp gradually using a torque wrench. For standard 2-inch T-bolt clamps, target 15–25 ft-lbs depending on manufacturer specs. Quarter-turn increments prevent distortion. Overtightening crushes the hose wall and damages the silicone matrix; undertightening allows micro-movement that wears the interface.
Common Installation Mistakes
Using the wrong hose size. Ordering based on the old hose ID instead of the fitting OD guarantees a mismatch. Always measure the fitting.
Skipping surface preparation. A quick wipe isn't enough. Oil, dust, and oxidation must be removed completely.
Overstretching during installation. Forcing a tight fit by stretching the hose creates permanent deformation and weak points.
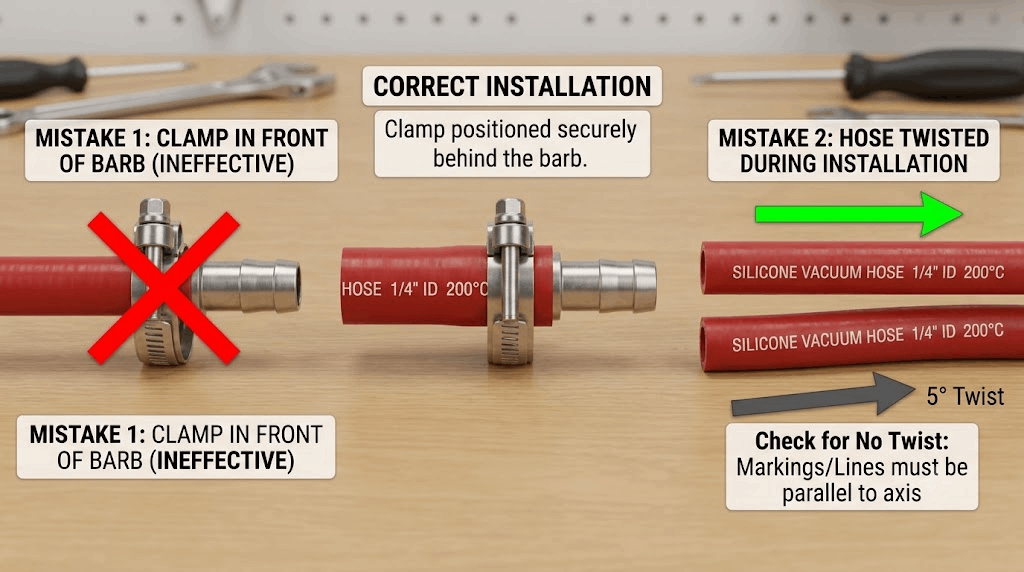
Misplacing the clamp. Clamps positioned in front of the bead don't prevent axial slippage. Behind the bead is non-negotiable.
Ignoring twist. Even slight rotation during installation creates torsional stress that accelerates fatigue.
Reusing old clamps. Stretched or corroded clamps can't maintain proper tension. Replace them with every hose change.
Post-Installation Checks
Verify No Twist
After installation, check that the hose has no twist. Even 5° of rotation reduces hose life by 70%; at 7°, degradation reaches 90%. The hose must sit straight with no rotational stress.
Twist introduces shear forces into the silicone matrix that it wasn't designed to handle. Over time, these forces cause internal delamination between the reinforcement layers, leading to bulging, softening, and eventual rupture. The failure isn't immediate — it develops over weeks or months, which is why twisted hoses often pass initial pressure tests but fail in the field.
To check for twist: look at any printed markings or color stripes on the hose. They should run parallel to the fitting axis. If they spiral, the hose is twisted. Loosen the clamp, rotate the hose to align, and retighten.
Confirm Proper Seating
Run your finger around the hose-to-fitting junction. There should be no gaps, no uneven compression, and no visible movement when you apply light axial pressure. The hose should feel firmly seated with uniform contact around the entire circumference.
Start the engine and let it idle. Listen for hissing or whistling sounds that indicate air leaks. For vacuum systems, use a smoke machine or propane enrichment test to identify subtle leaks. For boost systems, monitor boost pressure stability under load — dropping pressure suggests a slow leak.
Document Installation Details
Record the installation date, hose part number, clamp torque values, and any observations. This creates a maintenance history that helps diagnose future issues. If a customer returns with a problem six months later, you'll know whether the original install followed procedure or cut corners.
FAQ
Q: Can I reuse silicone hoses after removing them?
It depends on condition. If the hose shows no cracks, hardening, or permanent deformation, and the ID hasn't stretched beyond spec, reuse is possible. But silicone degrades with heat cycling and ozone exposure, so we recommend replacement for critical applications like boost or coolant lines. Vacuum lines in low-stress locations can sometimes be reused if they pass visual and flexibility checks.
Q: How tight should the clamp be?
Follow the manufacturer's torque specification, typically 15–25 ft-lbs for 2-inch T-bolt clamps. Use a torque wrench — guessing leads to overtightening (which crushes the hose) or undertightening (which allows slippage). Tighten in quarter-turn increments and check for uniform compression around the circumference.
Q: Why does my silicone hose keep slipping off even with a tight clamp?
Three likely causes: contaminated mating surface (oil or debris preventing friction), incorrect hose size (ID too large for the fitting OD), or clamp positioned in front of the bead instead of behind it. Clean the surface, verify dimensions, and reposition the clamp behind the bead.
Q: Can I use silicone hoses for fuel lines?
Standard silicone hoses are not rated for direct fuel contact. Fuel permeates silicone and causes swelling and degradation. Use fuel-rated hoses with fluorocarbon liners or specialized fuel-compatible silicone compounds. Shineyoo offers custom solutions for specific fluid compatibility requirements — contact us for details.
Q: How long does the advice in a silicone hose installation guide actually take to follow?
Roughly 10–15 minutes per hose on top of the basic swap. Cleaning both sides of the joint takes a couple of minutes, measuring the fitting OD takes one, and positioning the clamp behind the bead with a torque wrench adds a few more. That's the whole point — the extra time is short, but it's the difference between an install that lasts years and one that slips loose under boost.
Conclusion
If you remember one thing from this whole guide, make it this: clean the fitting until it's actually clean, and measure the fitting — not the old hose — before you order. Get those two right and the rest of the install nearly does itself. Skip either one and no clamp on earth will save the seal.
Need Custom Silicone Solutions?
Shineyoo manufactures a complete range of silicone hoses and SS304 clamps with OEM/ODM support for distributors and performance shops. Contact Shineyoo for custom specifications, temperature ratings, and sizing tailored to your application requirements.
If you are stocking a bay, the silicone vacuum hose kits run from 5 sizes to 6 sizes in 6.6 ft and 10 ft lengths, and the NBR fuel line kits cover 1/8″ to 1/2″ ID for small engines.